Monday, January 24, 2011

Obstacle into Opportunity


I've always said that there is no such thing as failure and that every obstacle is an opportunity. I teach this in all my classes as well. Every stumbling block you encounter can teach you something and tells you as much about what you should do as what you shouldn't.
I've had to learn this the hard way so many times now over the years that I now have a rule. When I hit a wall, a glitch, a tough time, or when I see something isn't working, I allow myself to indulge in three days of panic and worry and stress. But that's it. Then I stop, take out a piece of paper and make myself write answers to these four questions:
Is there something I did to cause this that I now know to avoid?
Is there something I can learn from this?
What gift or opportunity can I find here?
And what do I do now?
Great things come from this exercise. When I first created my clocks (which, if you've never seen them, are prints of my artwork laminated onto foam board) I loved them. But many of the people who picked them up were confused and disappointed because they thought they were tiles. They'd pause, and say "Oh...I thought it was a tile," then put it back down and walk away. I was surprised by this and frankly it upset me. After all my work and excitement about this new idea, I felt like I had to start over.

I stewed a while but then, I realized I could actually turn this into a selling point if I took a positive spin on it. When people walked up to my booth I started addressing the issue before they had a chance to notice it. I'd say "Go ahead, pick one up! It's actually not ceramic, it just looks like it." Out of curiosity they would pick one up and they'd always gasp "WOW! I thought it was a tile!" And that gave me the opportunity to say "I know! Isn't it great? They look like a tile, but they'll never crack or break and you can hang them on a push pin." My sales skyrocketed. And to this day, 15 years later this is still how I approach every single customer. In fact, this is now what I'm known for and what people love about my clocks.

Last year when many people were cutting art out of their budget and buying only necessities, I started to get really scared. But then I made myself stop and ask myself the questions. I realized people still want to shop and people still love art. So my job was to create a tiny little affordable gift that was also functional. I played with lots of ideas and really had fun with it and finally created a line of magnetic bookmarks, a little piece of art that anyone could afford that had a function and purpose. They are now being sold in stores all over the country and even won Museum & More's Gifty Award for Best Gift in the Paper & Stationery category.

I truly believe that every obstacle holds a gift inside of it whether a lesson, a new venture or a new idea. Sometimes it's easier to find it than others, but if you can stop and breath and look for it, it actually becomes fun and exciting to try and turn things around. 

Monday, November 8, 2010

Virtual Studio Tour

I am fascinated with other people's studios and work spaces. I love to see where other artists work, how they organize things, whether they decorate their space or prefer it to be purely functional. I like to see their storage and their furniture, how they utilize the light, whether they like to sit or stand, play music, watch TV or talk on the phone while they create. Some work out of their homes, some in the living room, some have separate studios or outbuildings, others work in the garage. Many studios are  work of art in and of themselves. We all make it work and we all do it differently.
So. I emailed some of my favorite artists from all over the country to send in images of their studios for a virtual studio tour. I'd like to do a this every so often. There are so many more people I would like to include. If you would like to share your work space images please email them to me at businessofcrafts@comcast.net 


Here is the first edition.  Thanks so much to everyone who responded! 

This one is from Angela Yoder, Villa Park Hearts in Olympia, WA. When you visit her site be sure to click on 'paper art' to check out her paper buildings.


These next three are Amy Peter's Studio in Avila Beach, CA. Amy has a pretty large operation and several employees. You've probably seen her jewelry in Femail Creations catalog and in stores all over the U.S. This shows her storage, metal stamps and shipping station. To see more of Amy's process, studio and employees, visit her blog.

Next stop: Caitlin Dundon of One Heart Studio, in Seattle. Caitlin's studio is at Venue, a beautiful retail space, where her work is for sale. Venue rents studio space to several wonderful artists. 

This is where Bonnie Riconda creates Calico Juno Designs. Bonnie is in Bronx, NY and has been featured in The Knot and Brides magazines, as well as many more. 

Colleen MacDonald of BCharmer Designs is right her in Olympia, WA. I was lucky enough to visit this charming little space. It's just beautiful. 


Next, we're off to visit Dee Janssen Glass in Broad Brook, Ct. 


And back to Seattle, WA to visit Joline El-Hai of Bella Luz. Joline's work is well known in the world of American Craft and is available all over the country.


 I bet you want to know what's in that glass cabinet. So did I:

Lisa Richey of Cheap Therapy makes handcrafter paper, journals cards and more in her studio in Lake Waccamaw, NC.  


Charan Sachar of Creative With Clay creates his work in Federal Way, WA. How anyone who does ceramics keeps their studio so clean and organized, I don't know. 

And another tidy potter, Tali Waterman of Forest's Edge Clayworks creates her work and teaches classes in studio. This studio is this little cottage on her beautiful, secluded property in Olympia, WA.


One more from here in Olympia. Pat Tassoni sent in these of his studio, Pat-Works. At first glance you may think that's a mess, but it's pieces and parts waiting to become one of Pat's amazing creations. 

Sunday, October 31, 2010

Studio Tour

I was writing the answer to Lara's great question about how to be prepared for unforeseen emergencies (see below, "Wholesale: It's Not as Scary as you Think") and it occurred to me that the easiest way to answer might be to show you my back stock. And then I decided that while I was at it, I might as well give you a complete studio tour.
So there I was snapping pictures, and it occurred to me that it would be even MORE fun to invite you to share yours, too.  I'd love it if you'd send me a picture of your studio or work space that I can share. I don't care if you work on a table in your dining room or have a huge studio with ten employees. I'll set up a virtual studio tour so we can all see each other's spaces. How fun is that? 
Here's my little tour:

My studio is two bedrooms with the wall knocked out between them. The left side is my office and painting table. (set up right now with a new beading project)


On the other side is my production area, a shipping station for the smaller orders, and stock and supplies. This table is where I assemble and box the clocks, on the left you can see all the labels. To the left of the desk are the cards and unfinished, unfolded bookmarks. 
Small order packing and shipping (large orders get packed downstairs in the shop) and small supplies
Here (just to the right of the work table)  is the closet full of finished clock faces, waiting to be assembled. 
And this what 3000 alarm clocks looks like. On the doors on the left are tiny shelves of finished bookmarks (about 1200 of them) and on the right, all the alarm clock labels.
Bins of magnets (about 1200 sets ready to ship).
 Now if you go outside, across a breezeway and open a door and go downstairs, there is the shop. This is where I do all my mounting, store boxes and other supplies and the clock back stock is here. It's also where I pack up the larger orders. I'm going to spare you the whole tour, but this is just a partial shot of the finished clocks. This wall is about twice this long and there are two full walls like this. These shelves are actually very empty because I just shipped a ton of orders. 
This week I'll be refilling all those empty spots. 
 Okay, now it's your turn. Please send (only one or two) images to: businessofcrafts@comcast.net. I'll put the post together later in the week.  And please invite your friends to send theirs too! Be sure to include your name, business name and website so I can post links!

Wednesday, October 20, 2010

A little bit of fun

I love my customers. I really, really do. I meet the greatest people selling my work at Pike Place Market and most days I love being there. But there are days - and those of you who sell your art for a living know what I'm talking about - that make you want to pull your hair out. So, my apologies in advance to all of my wholesale buyers and wonderful customers - I really do appreciate you all so much.
But after a long frustrating Saturday at my booth, I was inspired to to find a creative way to vent. So I made this little film and dedicate it to everyone who sells their work at crafts shows. 

Tuesday, October 19, 2010

Determining your wholesale terms


First, let me apologize for being a bad blogger. I have the best of intentions, I really do - but so many other things really have to come first and this blog always seems to slide down the bottom of my to-do list. I'd promise to be better about it, but I know it's unlikely I'll ever be a weekly blogger. There are always going to be busy times, or weeks I can't think of anything to write about, or when the topics I do want to write about seem like such a big project that I keep putting them off until I have more time. (And when exactly is that, anyway?)

So I'll just trust that you have lots of great blogs you're following and hope you appreciate that there's one that doesn't overload you with posts.

And now, on to the subject of wholesale terms:

Every artist who starts in wholesale has to start by establishing their terms, and most are confused and overwhelmed at the thought of it. So if you don't know what 'terms' means, know you're not alone and relax. I'm going to give you a simple explanation that should make this task a lot easier.

When you start approaching buyers, whether at their store or at a show, one of the first questions they are likely to ask is "What is your Minimum?"

Minimum refers to the minimum amount you require for a wholesale order. Most wholesalers have a minimum opening order – which is the first order they place with you, and a different minimum reorder. Deciding what your minimum will be depends on a few criteria. 

1. Every order must be profitable for you.
2. Your minimum opening order should create a nice display of your work but at the same time not require a huge investment for the buyer who is taking a risk on your line for the first time.
3. Your minimum reorder should make it easy for the buyer to restock and replenish their display long before they run out.

Your opening order is always larger, because you want to make sure the store carries and displays a strong mix of your work, enough to show it off and enough variety that there are choices for everyone. You also want the store to make an investment in your work. It motivates them to display and sell it well. Having a few items scattered throughout a store does not show your work well and generally doesn’t sell it as well, so small opening orders don’t serve you or the buyer.

Your reorder minimum should be smaller. My opening minimum is $200, my reorder minimum is $100. I want my buyers to be able to keep my display full and fresh without a big investment and with a smaller minimum they can reorder more often instead of waiting until they run out to reorder. In other words, if they have sold half of their first order, buying another $200 worth at that point might be too much for them. But they can easily refresh and fill out the display for only $100. And when I introduce new items they can easily buy a sampling of those to add to the line.

So, while it’s tempting to require a large minimums, remember that if you do it will not only turn away new buyers who don't want to spend too much on a new line, but it will also take longer for the store to run low which can make it look like your work sells slowly. The faster they see it disappear, the better!

Now, exactly how do you structure your minimum? Really, this is up to you.
You can require a minimum dollar amount or a minimum quantity of items. You can also require a buyer purchase a quantity of each color, each style, each item or each design.

For example: I can require that when ordering magnets a buyer must order 2 (or 6) of each design and order a total of 4 dozen. I allow my buyers to order anything as long as it adds up to my total minimum, but not every artist does. You can require that they order 48 pieces, 10 sets, or for example, a glass earring can be sold in sets of six, with the sets available in a variety of colors.

Some stores might need special consideration. I sell to several stores that only sell pet items or ladybug or horse themed items. For those stores I allow a smaller minimum since they have a narrow focus and I only have a few items that will work for them. 
When you set your minimum, figure out what works for you, and then always put yourself in the shoes of your buyer. It’s your job to make sure your policies work for them too. As I have said here before, your relationship with your buyer is a partnership. If they do well, you do well and vice versa. 

As always, if you have any questions about wholesale or any other topic please leave a comment or email me at pj@businessofcrafts.com.

Sunday, August 29, 2010

Artist Reception Friday Night


Just wanted to let everyone know that the show I wrote about in March opened on August 20th.

The artists reception is this Friday, September 3rd,in 5-8pm at Childhood's End Gallery at 222 Fourth Ave, in Olympia. I hope you'll stop by if you're in the area. It's a wonderful show. It's also First Friday in Olympia as well as the opening day of Harbor Days. It should be a fun night to wander downtown.

As you may recall, I named the show Let There Be Light. The gallery changed it to 15 Ways With Light. (I still like my name better!) 

Here's a sneak peek:


Friday, July 23, 2010

One Little Bowl

It all started with one little bowl. 
Several years ago on a trip to Santa Fe I visited the Museum of International Folk Art. There happened to be a huge festival that weekend and I wandered around in awe, blown away by the weaving, paintings, and especially taken by the intricately etched gourds from Peru.  But it was in the museum gift shop that I fell in love.

It was the Huichol beaded bowls that stopped me in my tracks. I was instantly smitten with them, mesmerized by the vivid color combinations, the intricacy of the patterns created by hundreds of tiny little beads, a stunning micro-mosaic inside a hollowed out gourd.

I was on a very tight budget at the time, but I couldn’t leave without one. I splurged on one tiny little bowl, about 2” wide. I remember that when I got home I unpacked it gently and held it cupped my hands, wondering who did this? What is the story, the history? The meaning of the design? How is it done? I set it on my windowsill with a few other collected treasures.

Over the years I picked it up often to marvel at it. I became obsessed, wanting to learn this art and translate it into something of my own. A few months ago the bug got so strong I finally sat down to do some research. I read that that Huichol (pronounced wee-chol) Indians of central Mexico create their art as an expression of their spiritual beliefs. A shaman guides them on a yearly pilgrimage ending in a ceremony which induces a visionary state. Their art derives from their visions. Originally the Huichol decorated the hollowed-out gourds with bits of shell, seeds and stones to use as offering bowls to the gods. When glass beads became available, they began using them.

I then went on to read about they were made, coating the gourds with a mixture of beeswax and pine pitch, applying each tiny bead one at a time, by hand. This is my first attempt, a clumsy practice on the lid of a wooden box. I wasn’t trying to create a cohesive design – just playing with different patterns, getting used to the rhythm of applying the beads, experimenting with color.
            
Then I went on to my own little (wooden) bowl.
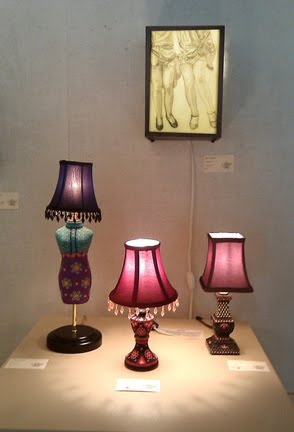
With just two practice runs under my belt, I decided to create some lamps for my upcoming show at Childhood’s End Gallery this fall. (see post below).  These two are made from wooden lamps each of which I decorated with about 4,000 beads . They are about 8 inches tall.
The next one started with a papier-mâché dress form.  This one is called Party Girl. She's about 18 inches tall with the shade, and I used over 12,000 beads to create her dress. It took endless hours. I secretly pray no one will buy her…
I am working on another larger bowl now and the ideas haven’t stopped coming. I dream of beading furniture, musical instruments, a birdhouse, shoes, the list gets longer by the day. I can’t stop, I’m in love with the process. It’s very meditative and I can totally see why it’s a spiritual experience for the Huichol. Of course, Peyote is also an important part of their ceremonies. I think I’ll skip that part.